


T8 Retrofitting Made Easy
LED tube light retrofitting involves installing an energy-saving LED tube light by replacing an existing T8 fluorescent tube.
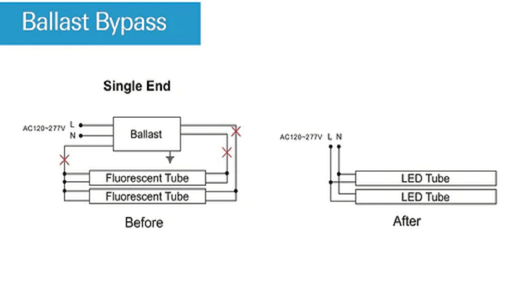
Why should You Bypass the ballast?
Understand that the ballast is responsible for providing a fluorescent lamp with an initial spike of high voltage. Once the light is on, the ballast acts as a current regulator. On the other hand, an LED driver converts the high voltage AC to low voltage DC. Since LED lights work on low DC voltage, they need a driver.
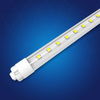
Most T8 LED tubes do not need a ballast. So, if you are going to install a T8 LED tube light, it will require a ballast bypass unless you choose a ballast compatible T8 LED tube.
There are three types of T8 LED tubes:
Type A: These are also known as ‘Plug and Play’ tube lights. They are compatible with linear fluorescent tube ballasts. Thus, when buying a Type A T8 LED tube, do not forget to ask for a ballast compatibility sheet.
Type B: These tubes are also known as ‘Ballast Bypass’ or ‘Direct wire’ T8 LED tubes. Installing them means you will have to remove an existing fluorescent tube ballast.
Type A+B: Also known as ‘Hybrid’ T8 LED tubes, Type A+B tubes work with or without a ballast.
To Shunt Or Not To Shunt!
You must also know that most T8 LED tubes need non-shunted tombstones (sockets). (Meaning that the tombstone should not show electrical Continuity.) If the existing fluorescent tube fixture you want to replace has a non-shunted tombstone, you can proceed with the ballast bypass procedure. Nonetheless, if the existing fixture offers a shunted tombstone, you should replace it with a non-shunted variant.
On the surface, performing a ballast bypass seems simple:
Remove the ballast and wave it goodbye. Then, fix the new T8 fluorescent tube light, and that’s all.

Albeit, not knowing (and following) the basics of electrical connections, wiring, and circuitry may lead you into a ‘shocking situation’ (for real)!
Here is a guide that will help you understand the basics of the electrical wiring system.
Once you are confident about working with electrical wiring, sockets, and light fixture, Performing the following steps will allow a successful ballast bypass:
1. Turn Off the Mains Power
Turning off the Mains Power supply will ensure that you won’t get an electric shock during the process. So, locate the circuit breaker switch that provides power to the area where you will carry out the bypass and turn it off.
2. Locate The Ballast On The fluorescent Light Fixture
Now, locate the ballast on the existing fluorescent fixture. Most T8 tubes will have a hidden ballast, covered with a casing and resting behind the tube light. Remove the case, lamp, and any cover that prevents you from reaching the ballast.
3. Cut The Hot And Neutral wires
Once you remove the tube and expose the ballast, cut the hot and neutral wires that supply input power. In general, the hot wires are black, and the neutral wires are white. Make a close cut and ensure that there are no longer than 2 inches of wires left.

4. Cut Socket Wires
After cutting the wires providing input to the ballast, cut the neutral and hot wires that go out on the other side of the socket.
NOTE: There are two types of ballasts: electronic and magnetic. The tube lights that use a magnetic ballast will also have a starter. If your tube light uses a magnetic ballast, make sure to locate and remove the starter before moving on to the next step.
5. Remove The Ballast
Now, you must take out the ballast by unscrewing it.
6.Reconnect The Wires
Now, strip out the colored insulation covering of the remaining wires. Ensure to strip about 1 inch of the wires. Connect the input hot and neutral wires (black and white) coming from the build to the output hot and neutral wires coming from the fixture. Use push-in connectors or wire nuts to complete and secure the connection. Since LED T8 tubes need a single-ended power supply. So, you only have to connect the input wires to one side of the output hot and neutral wires. (as shown in the figure)

Now, install the T8 LED tube on the fixture. Turn on the mains power supply. Switch on the LED tube light and check if it is working.
Congratulations! Your Ballast bypass and T8 Tube retrofitting are successful.
Note: This entire blog has been written only for single-ended ballast bypass retrofit. If you are interested to know about a double-ended ballast bypass retrofit, please check out this blog.

")
")
5 comments
Hi Laurie,
Thanks for your comment! If you’re looking to replace just one fluorescent light with an LED tube, the answer depends on the type of LED tube you choose:
Ballast-compatible LED tubes (Type A): These work with the existing fluorescent ballast, so you can simply replace one tube without removing or bypassing the ballast. Just make sure the tube is compatible with your ballast type.
Ballast-bypass LED tubes (Type B): For these, you’d need to remove or bypass the ballast for the fixture you’re updating. If you only update one fixture, the others can stay as-is, but keep in mind this can add complexity if you later decide to convert the rest.
If plenty of light is provided by one LED, you don’t have to replace all eight lights right away—just do what works for you! 😊
Feel free to share more details if you need help choosing the right LED tube. And I totally get the “overkill room” vibe—sounds like the previous owner liked things extra bright! 😄
Thank You, Team LEDMyplace.
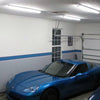
my manuf. home kitchen has EIGHT flourescent lights in the ceiling…can i just change one, or do i have to change/remove ballast from all eight to make it work? plenty of light with one…previous owner must have needed a kill room; or overkill room 🙄
please show me a wiring that includes a dimmer and powered through 277VAC with this type of lamp since it was mentioned that this is dimmable and can be operated from 110-277VAC
II need someone to check a ceiling fluorecent light. It has 2 tubes and it may need placement of the ballast. Do you know about how much it would cost?
Better description and diagram than I got from JAFE (just another f*****g electrian).